If you have been using formik and you have come across the “touched” property (Otherwise known as “Visited fields”), you might be wondering what it is and how to use it.
This article is just for that, we will go over what it is and how you can use Formik touched in your React application.
And as always I aim to write this without too much technical jargon so developers of all experience levels can understand and learn from this topic.
Let’s dive right in.
What is touched in Formik?
The “touched” property in Formik is a way to determine if a field has been used (or touched) by the user. It has the same structure as your Formik values/state and contains boolean values for each which tell you if the field has been visited by the user or not.
Here is a potential example of how this would work:
Let’s say we have a form and we are using Formik for that form.
We now initialize the form’s initialValues to be { apples: 0, name: 0 } with some basic validation, to see more about form validation with Formik checkout my last blog post: How to use Formik in React.
Our validation will say that apples has to be an integer that is larger than 0, and the name has to be a non-empty string.
In our form we create a basic input that changes the value of apples and one for the name as well.
When the user then updates the first input, for example the apples input, our entire validation will be run.
This is great as it means we can keep an eye on validating everything and catch any issues early. Unfortunately though, now we will have all the error messages which can be confusing to the user.
So, now, let’s say our user has entered “Seven” into the apples input, we would correctly display an error message here because it is not an integer.
But, we would also display an error for the “name” input because it is empty and our validation runs against the entire form.
This is not a great user experience for the user because they haven’t interacted with that input yet and might be confused as to why they have two error messages.
This is where Formik touched comes in, when we display the error messages, we can check to see which fields/properties the user has interacted with, by checking the touched property in formik.
The touched property will be the same structure as your formik form values but the values will be a boolean of either true or false.
So for us this would be like the following:
touched: {
    apples: true,
    name: false,
}
So if touched.apples is true, then display the error message for apples and then we do the same for the name input field as well.
Adding in this check will now only display the error message for the input that was interacted with, so the user would see an error message for the apples input and not for the name input because they haven’t touched that input yet.
How to use Formik touched in react
Now that we have covered what formik touched is, how it works and a use case, let’s take a look at how to use it.
First we need to create our basic form component:
import React from 'react'
import { Formik } from 'formik'
import * as yup from 'yup'

const formValidation = yup.object().shape({
  apples: yup.number().required().positive().integer(),
  name: yup.string().required().min(2),
})

export default function ExampleFormikForm() {
  return (
    <Formik
      initialValues={{
        apples: 0,
        name: '',
      }}
      validationSchema={formValidation}
      onSubmit={(values) => {
        // TODO: buy apples
      }}
    >
      {({ handleChange, handleBlur, values, handleSubmit }) => (
        <form onSubmit={handleSubmit}>
          <label htmlFor="apples">
            <span>Apples:</span>
            <input
              name="apples"
              type="number"
              onChange={handleChange}
              onBlur={handleBlur}
              value={values.apples}
              required
            />
          </label>

          <label htmlFor="name">
            <span>Name:</span>
            <input
              name="name"
              type="text"
              onChange={handleChange}
              onBlur={handleBlur}
              value={values.name}
              required
            />
          </label>
          <button type="submit">
            Buy apples
          </button>
        </form>
      )}
    </Formik>
  )
}
Now let’s add some basic error handling by displaying any errors within errors.apples:
import React from 'react'
import { Formik } from 'formik'
import * as yup from 'yup'

const formValidation = yup.object().shape({
  apples: yup.number().required().positive().integer(),
  name: yup.string().required().min(2),
})

export default function ExampleFormikForm() {
  return (
    <Formik
      initialValues={{
        apples: 0,
        name: '',
      }}
      validationSchema={formValidation}
      onSubmit={(values) => {
        // TODO: buy apples
      }}
    >
      {({ handleChange, handleBlur, values, handleSubmit, errors }) => (
        <form onSubmit={handleSubmit}>
          {
            errors.apples && (
              <p style={{ color: "red" }}> {errors.apples} </p>
            )
          }
          <label htmlFor="apples">
            <span>Apples:</span>
            <input
              name="apples"
              type="number"
              onChange={handleChange}
              onBlur={handleBlur}
              value={values.apples}
              required
            />
          </label>

          {
            errors.name && (
              <p style={{ color: "red" }}> {errors.name} </p>
            )
          }
          <label htmlFor="name">
            <span>Name:</span>
            <input
              name="name"
              type="text"
              onChange={handleChange}
              onBlur={handleBlur}
              value={values.name}
              required
            />
          </label>
          <button type="submit">
            Buy apples
          </button>
        </form>
      )}
    </Formik>
  )
}
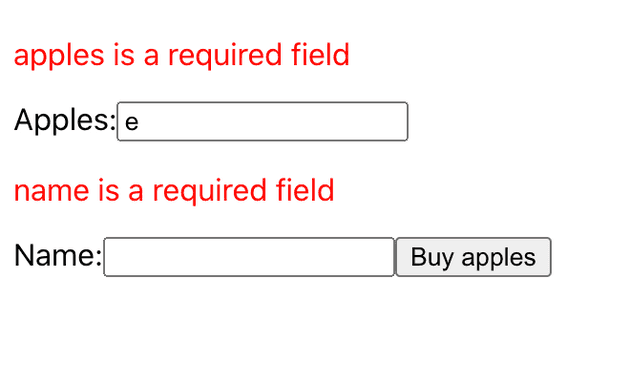
Here is how that will now look:

As you can see we are displaying both error messages, even though we have only updated the “apples” input.
Let’s fix that by applying formik touched to our form:
import React from 'react'
import { Formik } from 'formik'
import * as yup from 'yup'

const formValidation = yup.object().shape({
  apples: yup.number().required().positive().integer(),
  name: yup.string().required().min(2),
})

export default function ExampleFormikForm() {
  return (
    <Formik
      initialValues={{
        apples: 0,
        name: '',
      }}
      validationSchema={formValidation}
      onSubmit={(values) => {
        // TODO: buy apples
      }}
    >
      {({ handleChange, handleBlur, values, handleSubmit, errors, touched }) => (
        <form onSubmit={handleSubmit}>
          {
            errors.apples && touched.apples && (
              <p style={{ color: "red" }}> {errors.apples} </p>
            )
          }
          <label htmlFor="apples">
            <span>Apples:</span>
            <input
              name="apples"
              type="number"
              onChange={handleChange}
              onBlur={handleBlur}
              value={values.apples}
              required
            />
          </label>

          {
            errors.name && touched.name && (
              <p style={{ color: "red" }}> {errors.name} </p>
            )
          }
          <label htmlFor="name">
            <span>Name:</span>
            <input
              name="name"
              type="text"
              onChange={handleChange}
              onBlur={handleBlur}
              value={values.name}
              required
            />
          </label>
          <button type="submit">
            Buy apples
          </button>
        </form>
      )}
    </Formik>
  )
}
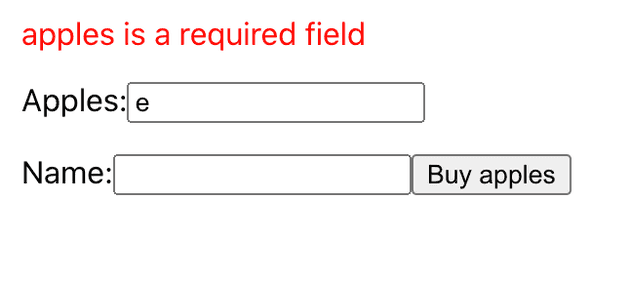
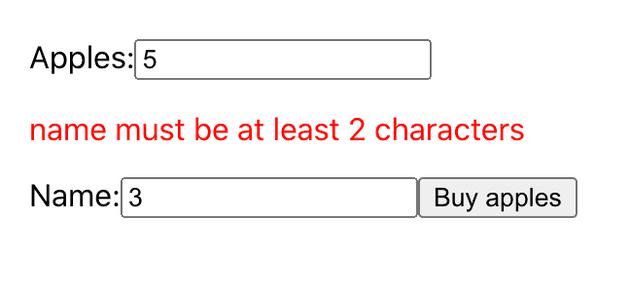
Now we have our final form, here is how it looks with our error handling and formik touched:
With apples containing the error:

With name containing the error:

And there we have a working form with Formik, Validation, Error handling and Formik touched in React that can show the user where the latest error is coming from.
To summarise what Formik touched is:
Formik touched is a great way to easily improve the user experience in forms when using Formik.
It will tell you when a user has interacted with visited fields which gives you the ability to improve the ux.


